Heavy Delta - Blue and White Diamonds in ZenAlgo
The blue and white diamonds combine an opposing-delta condition with an extreme WaveTrend reading. They highlight moments where participation and momentum make a possible reversal worth inspecting.
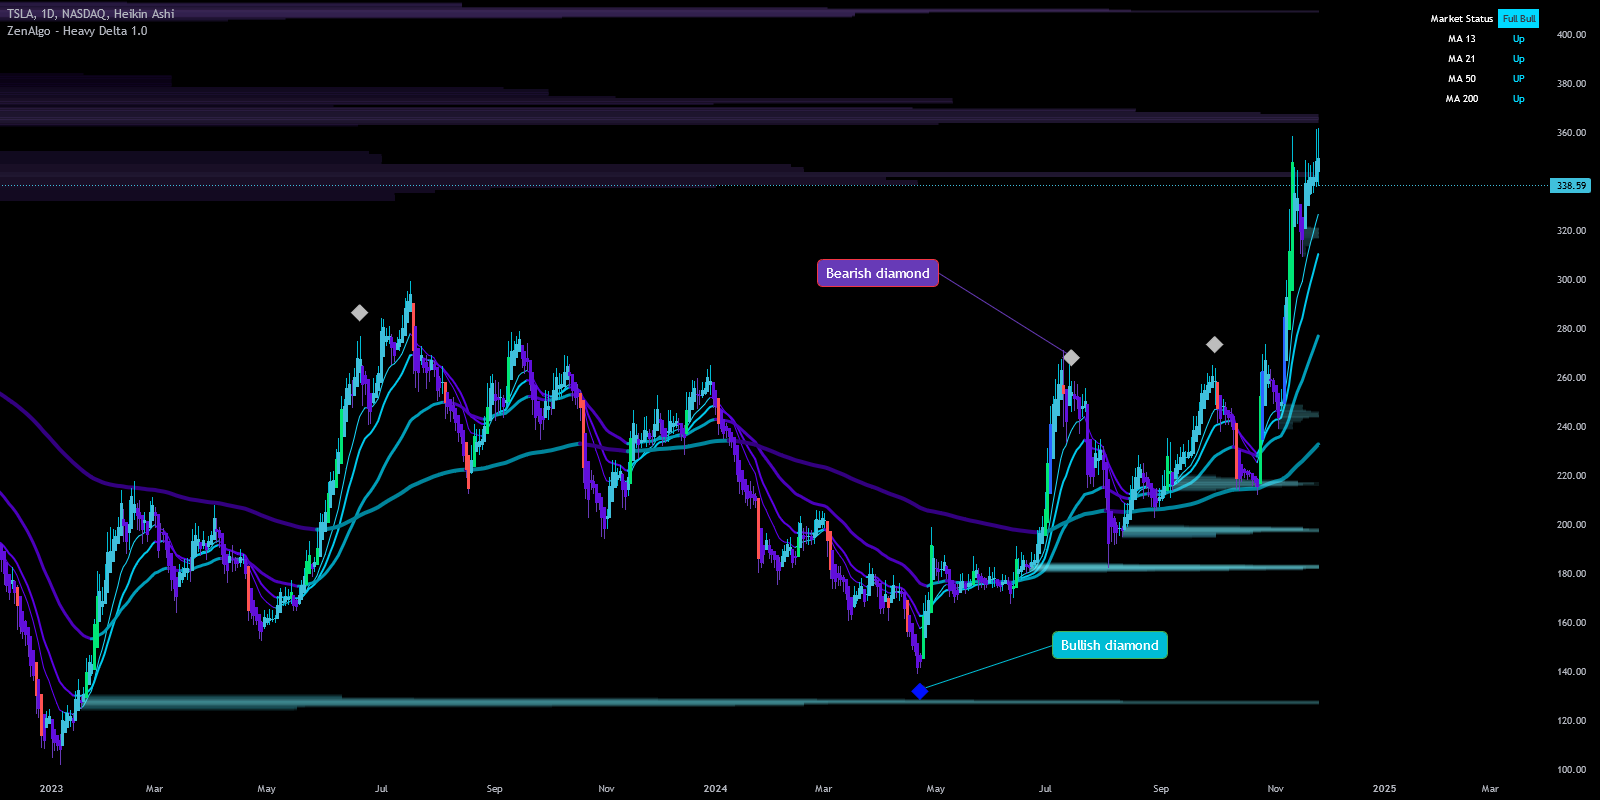
What Do the Blue and White Diamonds Represent?
Blue Diamonds: Bullish Signals 🚀
- The blue diamonds indicate a bullish signal that may suggest market strength and a possible upward move.
- Triggered when:
- Positive Delta indicates buying pressure.
- Wave Trend (WT1) is in an oversold condition, signaling a potential bounce or reversal.
- A blue diamond becomes more relevant near support or after a clear downside extension.
White Diamonds: Bearish Signals 🛑
- The white diamonds represent bearish signals, pointing to strong selling interest and a potential downward reversal.
- Triggered when:
- Negative Delta shows increased selling pressure.
- Wave Trend (WT1) reaches an overbought condition, indicating market exhaustion.
- A white diamond becomes more relevant near resistance or after a clear upside extension.
Diamonds show potential but are not guarantees. To strengthen your signals, pair blue diamonds with support zones or white diamonds with resistance levels.
Diamond Size and Significance
The size of both blue and white diamonds changes based on the intensity of Delta combined with Wave Trend levels. This dynamic sizing helps traders gauge the strength of each signal at a glance:
| Diamond Size | Meaning |
|---|---|
| Normal | Pronounced divergence, indicating a strong buying or selling force. |
| Large | Extreme condition suggesting intense buying or selling pressure; requires confirmation and defined risk. |
How to Use Diamond Sizes
- Normal Diamonds: Indicate strong alignment; useful for adding to existing trades.
- Large Diamonds: Show a more extreme delta condition. They deserve attention, but not automatic entry.
Small diamond conditions exist internally but are not displayed in the current version.
Larger diamonds mean a larger delta anomaly. A large blue diamond near support or a large white diamond near resistance is more relevant than the same marker in the middle of a range.
Trading with Blue and White Diamonds
-
Using Diamonds as Entry Points
- Blue Diamonds: A prompt to inspect a possible bullish reversal, especially near support.
- White Diamonds: A prompt to inspect a possible bearish reversal, especially near resistance.
-
Combining Diamonds with Other Indicators
- Diamonds are more effective when confirmed with other indicators like Order Blocks, RSI, or Ichimoku Cloud. For instance:
- Blue Diamond + Support Zone: Reinforces a potential reversal for long trades.
- White Diamond + Resistance Zone: Confirms a possible short trade opportunity.
- Diamonds are more effective when confirmed with other indicators like Order Blocks, RSI, or Ichimoku Cloud. For instance:
-
Applying Risk Management with Diamonds
- Use stop-losses aligned with nearby support or resistance. For example:
- A long trade based on a blue diamond should have a stop below recent support.
- A short based on a white diamond should have a stop above the nearest resistance.
- Use stop-losses aligned with nearby support or resistance. For example:
A blue diamond in an oversold RSI zone or near an Order Block increases the likelihood of a successful trade. Similarly, a white diamond near resistance or in an overbought RSI zone can be a strong short signal.
Advanced Tips for Using Diamonds Effectively
-
Stacking Divergences for Stronger Signals
- Blue Diamonds: Look for confluences such as Wave Trend and RSI both showing oversold conditions, paired with a blue diamond near a support zone. This combo strengthens the bullish reversal signal.
- White Diamonds: When white diamonds appear with overbought RSI and at key resistance, it suggests strong downside potential.
-
Scaling In and Out of Positions
- Normal Diamonds: Use as a prompt to inspect the setup and define risk.
- Large Diamonds: Mark more extreme conditions, but still require confirmation.
Configuration
ZenAlgo allows you to customize diamond settings to best suit your trading style.

Summary
Color shows direction and size shows the relative delta condition. Use the diamonds to locate possible reversal areas, then judge whether price confirms or invalidates the idea.
Alerts
Blue and white delta diamonds do not have dedicated built-in alert conditions.